- Download RAT Server Manager from here:
Alpha 19 -> https://www.jffgaming.com/resources/7d2d-rat-2-0-alpha-64-bit-alpha-19-compatible.7/download
Alpha 20 -> https://www.jffgaming.com/resources/rat-3-7d2d-alpha-20-compatible.15/download
then install it to your PC - Go to the gamepanel for your server and stop your server.
- Click "Configuration Files" and open the "Pingperfect.xml" config file using the config editor
- Make sure Telnet is enabled, and you've set a Telnet password.
- Press "Save" in the top left
- Select "Mod Manager" and install both "Bad Company Server Manager" and "Alloc's Server Fixes"
- Start your server.
- Open RAT Server Manager on your PC, now we need to input the connection details, they are as follows:
Use Server Settings - Unticked
Host - Server IP Address
Port - Server Telnet Port
Password - Server Telnet Password
It will look something like this: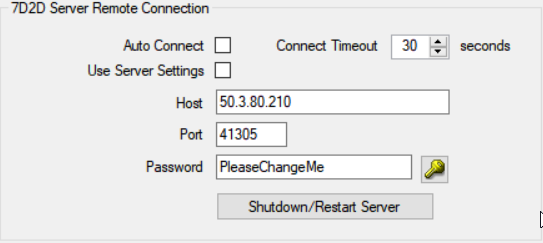
- Press the "Connect" button (the lightning strike symbol) - RAT Server Manager will then connect to your server.
To confirm that it has connected successfully, check the bottom right of RAT Server Manager, there should be 3 Green Light's as shown below:
- You can now use RAT Server Manager's many features, the only one that won't work is the Server Settings functionality, you will need to continue to use our gamepanel for that.
- Enjoy! Any problems, let us know via support ticket and we will gladly assist.
Looking for a game server host known for brilliant 24/7 customer support and quality hardware?
Try a Pingperfect 7 Days to Die server today! https://pingperfect.com/gameservers/7-days-to-die-server-hosting-rental
